Showing posts with label Technology. Show all posts

Friday, 14 August 2020

How to Add MBOX File to Office 365 Manually

Read this article, if you need to know about how to add an MBOX file to Office 365 manually & alternatively. This MBOX to Office 365 migration article is created for such persons who would have a requirement to transfer MBOX file data to Office 365 and are facing trouble finding out the exact solution. In this article, we will explain the manual process but it is lengthy so users who have an urgent requirement and want to directly add MBOX files in Office 365 then they can also go with its alternative solution.

Why Users go with Office 365 from MBOX

 MBOX file format is supported by 25+ mail clients & webmail clients (Thunderbird, Mac Mail, The Bat!, Gmail, Mulberry, Postbox, PocoMail, SeaMonkey, Spicebird, Entourage, etc.) and Office 365 is more in demand than other mail clients because it is cloud-based and supports multiple programs. O365 is simply accessible at any location on any system by only internet connectivity. It is a business purpose cloud-based web app and provides advanced & developed functionalities which are required for every business user. Some advanced functions are provided below which make it more attractive and useful than MBOX file format supported mail clients –

·        O365 enables you to collaborate online & get changes your team creates to share documents in real-time.

·        Easily communicate with your co-workers.

·        O365’s power map, part is its smart & interactive data visualization function in Excel.

·        Its planer function offers an easy way of making workflows for projects & providing individual tasks in the flow over to persons.

·        It automatically creates a list of high-priority emails before low-priority mails.

There are lots of advanced functions which make Office 365 strong. Some other reasons to add an MBOX file in Office 365, maybe others such as – business requirements, workplace needs, interest in changing mail clients, etc. Reasons may be any to get MBOX files data into Office 365 but the main concern is how can users do this task? Let’s, follow the given manual and alternative solutions to do this task –

How to Add MBOX File to Office 365 Manually

MBOX and Office 365 are absolutely different from each other, and Office 365 has no direct export or import function to move MBOX data in Office 365 but a manual trick can do this task and fulfill your requirement to add an MBOX file to Office 365. It has multiple stages, if you want to know the manual trick then follow the provided stages –

 Stage 1 – Save MBOX files in Thunderbird

·        Collect all MBOX files and install Thunderbird on your computer.

·        Open Thunderbird and add ImportExportTools Add-ons in it.

·        Then go to Tools Menu >> ImportExportTools >> Import MBOX Files

·        Browse & select MBOX files from the source location.

Stage 2 – Export Saved Emails in EML from Thunderbird

·        Re-open Thunderbird on your desktop screen.

·        Select Emails data that you need to transfer.

·        Drag them & Drop them t any location.

·        It will be saved in EML file format.

Stage 3 – Import EML Files in Windows Live Mail

·        Install Windows Live Mail in your system.

·        Create a new folder with any name by right click on the mailbox and going to create a new folder option.

·        Select all EML files further in om saved location.

·        Drag them & drop them in the newly created folder of Windows Live Mail

Stage 4. Export Data from Windows Live Mail to Outlook

·        Now install Outlook but make sure that Windows Live Mail & Outlook both should be installed on the same machine.

·        Re-open Windows Live Mail on your desktop screen.

·        Go to File menu >> Export >> Export Messages >> MS Exchange.

·        Choose the folder which needs to export in Outlook for migration.

·        Click on the OK button and the process will start and complete with a confirmation message.

Stage 5. Export PST from Outlook & Import into Office 365

·        Open Outlook and check the imported data.

·        Go to File menu then go with Open & Export function >> ImportExport option.

·        Choose Export to a file option.

·        Then select Outlook data file and mailbox which need to import into Office 365.

·        Choose the location & name of the PST file. Click on the finish button.

·        After that follow the webpage (https://www.pcvare.com/import-pst-to-o365-drive-shipping.html) – which help to assist in importing PST file into Office 365.

Limitations of Manual Method

·        Windows Live Mail & Outlook both mail clients must available on the same machine. Otherwise, it will not work.

·        Any missed step can lose your data therefore follow it carefully.

·        It will not suitable for non-technical users.

·        It may waste your time to follow the provided multiple stages.

·        If any technical issue occurs then your data may be lost.

How to Add MBOX Files to Office 365 Alternatively

 If you don’t want to get any risk and need to directly import MBOX files to Office 365. Then at this time the MBOX Converter can help you and simply overcome all migration issues of MBOX to Office 365. It is a capable MBOX to Office 365 migration solution to directly import MBOX files of any supported mail clients – Thunderbird, Mac Mail, Entourage, Eudora, PocoMail, Postbox, etc. to Office 365. It not only imports all MBOX files to Office 365 even also supports transferring multiple MBOX files into other user profiles of Office 365 admin accounts using its “I am admin” option. It supports the batch data migration function to import all MBOX files to Office 365 at once and save your time from single processing. It works with a very simple user interface so anyone can simply handle it without any issue.


Still, have confused about which solution is the best to perform the migration from MBOX data files into Microsoft Office 365, then you can try the above-mentioned processes. To know about how to import MBOX Files into Office 365 you can download & export 25 emails from each selected MBOX file to Office 365 without any cost (absolutely free). Therefore, you can solve the entire issue yourself without any confusion.

Posted on August 14, 2020 | Categories:

Wednesday, 12 August 2020

How to Add Outlook Email to Office 365 Manually

 Read this blog to solve how to upload PST to Office 365 or how to add Outlook Email to Office 365 query with manual & alternative solutions. Frequently it is seen that Outlook users face difficulties in moving Outlook PST files to Office 365 manually because the manual method is technical & confusing so, in this blog, we will describe both manual and alternative solutions to get Outlook data into Office 365 properly.

Moving Outlook PST File to Office 365 Manually

 Office 365 doesn’t have a direct import function to upload PST to Office 365 without Outlook but a drive shipping trick can do this task. So if you want to know how to add Outlook Email to Office 365 then firstly, you must follow the given requirements for this process –


·        Users should be given created a folder for the import-export role to add PST file in Office 365.

·        Organization must have FedEx and DHL accounts.

·        Protection timing must be set for an unlimited time frame.

·        Hard disk in which PST file is moved must be BitLocker encrypted & less in size or 6TB.

Now follow the provided steps –

Step a. Download Import Tool

Follow the given steps to download the Import tool and safe key

·        Go to https://protection.office.com web page and login with Office 365 account then click on Permissions >> Management >> Import

·        After that go with the left side and Users >> Import >> choose Ship data on physical hard drives showing function under the +” icon.

·        Click on the Download tool function to install the WAI Import tool

·        Get the displayed key & store it in a file.

·        Now go to Cancel to close the page.

Step b. Save PST File in Hard Drive

·        Go with WAI Import Export Tool stored location under the CMD on your system.

·        After that follow the provided command to save the PST file on Hard Disk.

 /j: –Journal File Name that has the information about the drive.

* /t: – Hard Disk’ drive letter and it is connected to the local system.

* /id: –the copy session name for getting PST file to Exchange Online.

* /srcdir: save path of stored .pst files.

* /stir: save location route of Microsoft cloud where PST will be added.

* /SK: secure key.

* /logdir: log file storage location.

* /encrypt: BitLocker encryption key.

After that run the provided command to add the PST file in Office 365 by ImportExportTool of WAI.

Step c. Generate PST CSV File or Import Mapping

Microsoft Data Center adds the PST file to its azure data storage from Hard Disk. The import facility accepts data existing in Mapping or CSV files for checking the user mailbox PST which needed to be added. So download the CSV file and open it on your computer.

Step d. Create PST Import Job

·        After that go to O365 Admin Center Import Page & choose Import Services >> New Job + >> Ship Data on Hard Drive.

·        Check the options “hard drives are ready” & “I have access to mapping file” from the ‘New Job’ page Then go with the Next button.

·        Provide the name to the Import PST process.

·        Go with the ‘+’ icon & go to the location of the stored WAI ImportExport.exe tool.

·        Add journal file >> then next to import PST for Exchange Online storage.

·        Click the ‘+’ function & select the CSV file created in the previous step. Click on the Next button.

·        Provide the contacts information and hit on the finish function.

Step e. Ship Hard Drive

At last, users have to send the hard drive disk to MS headquarters. You must save the tracking number shipping label to track your shipment.

How to Add Outlook Email to Office 365 Alternatively

The above-mentioned manual ship method of moving Outlook PST files to Office 365 is not simple for the non-techniusersuser and if any step is missed by mistake then your data may lose. So if you don’t want to go with the manual trick and want an urgent solution then go with Outlook to Office 365 Converter which is capable of directly uploading PST to Office 365 without Outlook and also supports the function to directly add Outlook data files to Office 365 without any data loss. It supports the  ‘load Outlook profile’ function that helps to add configured Outlook data for migration. So you don’t need to search Outlook (configured) data individually. It also supports Add Files/Folder option to upload PST to Office 365 without Outlook. If you have confusion then you can also download it freely and add 25 Outlook data files and emails to Office 365 free of cost. Therefore, you can simply also checkout both processes before going with any decision to solve how to add Outlook Email to Office 365 perfectly.

Posted on August 12, 2020 | Categories:

Sunday, 5 July 2020

How to Transfer SmarterMail to Outlook with SmarterMail Add to Outlook Solution

When SmarterMail users find the exact solution for how to Transfer SmarterMail to Outlook in simple steps most of the time they face difficulties. This article has been created for such users who are looking for a complete SmarterMail to Outlook migration solution. Read this article till the end & get complete information about SmarterMail, Outlook, the importance of Office 365, and the precise solution for SmarterMail add to Outlook.

How to Transfer SmarterMail to Outlook with SmarterMail Add to Outlook Solution

Some Facts about SmarterMail & Outlook

SmarterMail is an advanced hosted mail solution that provides functions that are comparable to Exchange. It offers functions video & audio chats and collaboration products as part of the subscription. Complete-featured mail service and it offers commercial functions – notes, emails, contacts, and calendar similar to MS Exchange including protecting products that are equivalent to Exchange. SmarterMail is a web-mail app that also supports administration products for assistance to operate them smoothly. It is created for ISPs, Web Hosts, Enterprises & small businesses.
Outlook is desktop mail app and part of the Microsoft Office Package, provided by Microsoft Corporation. Outlook is used by almost all users in the personal & professional fields so its demand has increased. It supports multiple advanced functions – mails, contacts, calendar, tasks, journals, reminders, etc. Its GUI is very easy so anyone can simply use it to manage & share data all over the world. Organizations in a multiplicity of industries are going with Outlook as their mail client due to its functions & advanced capabilities. Attractive functions of the app also supply employability & increase efficiency in the workplace.

Why do Users Go with Outlook from SmarterMail?

·       Outlook supports all beneficial functions and can be used for personal & professional purposes on the level of large, small & medium business levels.
·       Outlook is provided by Microsoft Corporation which is a well-known brand for app production so users can simply trust it.
·       Outlook can be simply connected to Exchange Server for managing data and synchronized with Microsoft Office 365 for importing data.
·       Outlook is a default part of MS Office Package which is used by most users of computers/laptops/desktops so its use demand becomes high.
·       Outlook also provides mail, contacts, calendar, notes, journals, reminders, and tasks services which are also available in SmarterMail paid plan so it is more useful than SmarterMail.

How to Add SmarterMail to Outlook in Simple Steps

Now the question arises that how to transfer SmarterMail to Outlook perfectly then the answer is SmarterMail Converter because no direct or manual solution is available to sort out this problem so the app is created and helps to completely add SmarterMail GRP files to Outlook at once. It can add all data into Outlook in single-time processing and users can also go with its “I am exporting multiple users” option that helps to transfer multiple SmarterMail users’ accounts data to Outlook PST at once and save your time from single processing. To know about its working process follow the given simple steps –
·       Download & launch the SmarterMail Converter on your desktop.
·       Select SmarterMail data from the source location by providing two options. You can also Tick on the “I am exporting multiple user” option If you need to convert multiple users' profile data to PST from SmarterMail.
·       Then the select files will be shown in a list with a check-box, select files by clicking on the check-box on the file. Click on the Next button.
·       Then choose the PST option from provided saving options. After that choose the destination path and advance filter if you need it and click on the Convert button.
·       Migration will start and complete with a successful message. Click on the OK button then the resultant folder will be opened automatically.
·       Open your Outlook go to File Menu >> Open & Export >> Import/ Export >> Browse your resultant PST file and view in Outlook.

Over to You

Finally, you will get complete data migration from SmarterMail to Outlook. Still have confusion or doubt then download it and transfer 25 emails, contacts, calendars, notes, tasks, and other files from selected each SmarterMail folder to PST for Outlook free of cost and solve your issue yourself with complete trust. Now try and resolve the complete issue regarding SmarterMail add to Outlook without a data loss process.

How to Transfer SmarterMail to Outlook with SmarterMail Add to Outlook Solution
Posted on July 05, 2020 | Categories:

Wednesday, 1 July 2020

Kerio Connect Migration to Office 365 Solution to Migrate from Kerio to Office 365

How to migrate Kerio connect mail to office 365?

Are you a Kerio Connect user and want to migrate Kerio Connect mail to Office 365 directly? Then you are on an exact platform. This article is created for describing the precise migration of Kerio Connect Mail to Office 365 with no data loss. Kerio is a good mail server and feature-rich solution for mailing, messaging & collaboration but it is not perfect for all types of organizations that would need for large, medium, or small level business & maintain data. Therefore, several organizations or users are searching for the perfect Kerio to Office 365 migration solution. Before describing the exact solution for that, let’s get some information about Kerio, Office 365, and why users go with Kerio from O365.

Kerio Connect Migration to Office 365 Solution to Migrate from Kerio to Office 365
When Kerio Connect was introduced in 2011, it became a precise groupware solution offering a well-tested & complete email solution. Even though it has been well-built significantly since then, still it supports some drawbacks which may directly affect large business organizations therefore many organizations go for conversion to MS Office 365 or Exchange Server because these two programs are the perfect software for Microsoft to handle data for large, small & medium organizations.

Why Users go for Migration Kerio Connect Mail to Office 365

For the un-professionals, Kerio Mail Connect is mostly offered for medium & small business purposes, but when the companies grow up in size then automatically their requirements also grow. The email solutions that were suitable to work in the past could not be helpful in the present. A large business organization required well-developed functions with good security & complete control.
If you are using MS Outlook with Kerio & you may have slow skills, convincingly, Kerio does not put together well with Outlook. Microsoft Outlook is precise experience with Microsoft Exchange Server because we know both are the Microsoft team program and simply merge together prolifically. Multiple phases make Office 365 more suitable than Kerio Connect.
Why is Office 365 better than Kerio?
As we well know that MS Office 365 is offered by Microsoft Team for business purposes and it is simply connected to MS Outlook for database Importing processing. Through large users- support & having its considerable personnel, Microsoft Team doesn’t only manage to verify its products with O365 better than its competitors but also offers new versions usually with exclusive functions & latest technologies at common periods.
There are also components of expertise and legacy. The reputation of systems about the global use of Microsoft Tools as a business suite by Office 365 offers additional benefits of integrating popular Office programs smoothly. Microsoft Office 365 offers One-Drive, Power BI, SharePoint, Teams, and Yammer that are in the Office 365 subscription package.
No doubt that no one can hit Microsoft Team attempts to data safely. Microsoft is well-known for data safety, and the primary needs of users and it acquires almost conformity needs of the business. Office 365 supports advanced functions – Virus protection, and O365 web app safety which is probably the largest wide-ranging protection package for large enterprises. It is shared with an Exchange management shell which allows the admin to generate low-level arrangements changes & script bulk changes which are the precise solution for all kinds of organizations.

Kerio Connect Migration to Office 365 – Precise Solution 

For getting complete & effective Kerio to Office 365 migration, there is no direct & manual migration solution available and at this time the Kerio Converter helps them to perfectly migrate from Kerio to Office 365. It is created for users’ assistance after observing the complete requirements of Kerio migration to O365. It supports multiple well-developed functions which provide exact & safe migration from Kerio Connect Mail to Office 365. To know its complete working, follow the given simple steps –

How to migrate from Kerio to Office 365 in simple steps 

·        Download the Kerio Converter and launch it on your computer screen.
·        Select Kerio Files using provided options (Select Files…. & Select Folders…). If you want to export multiple Kerio user's accounts data at once then tick on the “I am converting multiple users” option and then select files using two options. Click on the Next button.
·        After that, a selected files list will be displayed there with a check-box, choose files by clicking on the check-box of the file which wants to migrate in O365. Click on the Next button.
·        Choose the Office 365 option and provide login details of the O365 account. Choose other desired options – item filters, advance filters, etc. Click on the Connect button to start the migration process.
·        After that migration will start and complete with a confirmation message.

Conclusion

 Now you can also resolve how to migrate Kerio connect to Office 365 by simply query. Still have doubts or confusion then download it and check yourself free of cost 25 items (mails, contacts, calendar, notes, tasks, etc.) migration from Kerio to Office 365. Therefore, solve all issues regarding the Kerio to O365 migration. 

Kerio Connect Migration to Office 365 Solution to Migrate from Kerio to Office 365
Posted on July 01, 2020 | Categories:

Tuesday, 27 August 2019

PDF Split and Merge – Combine & Break PDF Files to Manage


PDF Split & Merge is a two-in-one solution to merge, combine & join PDF documents into a single PDF document format and split a large size PDF file into small size PDF files.

Sometimes, users want to split/merge PDF files. Suppose a user has a large PDF file and he wants to share every page with a different user. In this case, the user wants to split the PDF file into parts to send the required page to the respective user.
Small PDF files cannot be managed easily so user finds a need to merge them into a single PDF file for easy handling and management of PDF files.
A user may have thousands of PDF files in his system. Some may be limited in size or some may be large. Both the PDFs are not easy to manage. Expansive files can be lost accidentally. So, in these cases, the user needs the best solution to manage PDF files and save them from these threats.
Solutions to merge and split PDF documents
There are lots of solutions available that will combine PDF documents and break large PDFs into smaller parts. Here, we are disclosing both the manual solutions and software solutions to manage PDF documents.
Manual method to split PDF file
  •  Open the Adobe Acrobat program
  •  Click on File > Open and choose the required file
  •  Go to document and click on the split document
  •  Select the number of pages and file size
  •  Click ok and select the desired location
  •   Finally, click OK

Manual method to merge PDF file
·        Open the Adobe Acrobat program
·        Click on Tools > choose to combine files
·        Click Add files and select the ‘Add files option’
·        Set the number of files and their arrangement
·        Finally, click combine files

Limitations of the manual method
·       Lengthy and complicated process
·        Duplicates files are merged
·        Adobe software full version needs to be installed properly
·        No surety of data safety  
·        Needs technical expertise to handle the steps

Automated Solution – PDF Split and Merge software
PDF Split and Merge is one of the fast and quick methods to merge/split PDF documents without having any damage to PDF documents. It is a multi-functional utility that not only splits oversized PDF files but also merges multiple PDF files into a single PDF.
Key attributes of the software
·        Dual role application
·        Split large PDF files into smaller parts
·        Merge multiple PDF files
·        Makes easy handling and management of PDF files
·        Safe platform with no damage
·        Free demo of PDF Split and Merge Tool
·        No requirement for technical expertise
·        Available to run on all Windows operating systems
·        Independent application with no data loss
·        No limit set to join and break PDF documents

Full working of the software

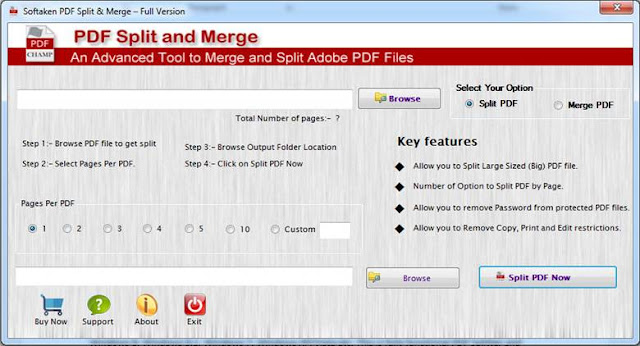
The software works fairly for you only with 4 steps. After that, you will get proper results as per your choice.
Here are the steps discussed below for you -

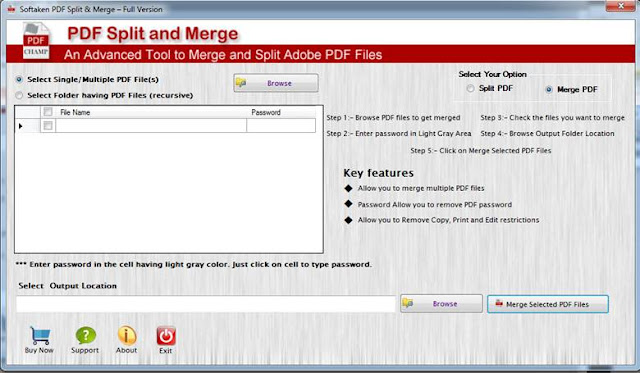
Step 1. Quick adding of PDF files to the software screen
You can easily add PDF file (s) to the wizard by the Browse option. You are free to select single or multiple PDF files. You can load a full folder containing various PDF files.

Split PDF - With the split PDF option, you can split any number of pages per PDF. The user finds good control on management using Split PDF.


Merge PDF – you are free to select any number of PDF files


Step 2.  Easy checking of PDF files for merge/split
Once the files are safely loaded to the wizard, you can check the easy preview of the files which you have loaded to the software screen. You can uncheck unwanted PDF files if you want to wish.

Step 3. Easy way to define the location to save the output

You have the freedom to easily define a desirable location to save output results. You need not make more efforts for saving the resultant files. The whole path to save the resultant file is clearly shown here.

End Note
We have explained both manual and software techniques that will help you to manage your PDF documents. You can opt for any of the methods from them.
I would like to personally recommend the software technique to all the users because it provides many innovative and advanced features which you will not find in the manual approach. You can practically examine the application with a demo version where you can merge or split some limited PDF documents but the demo version is very helpful in judging the application before applying for the license version. To clarify doubts of the users, a customer executive team is there that will completely assist users.
Posted on August 27, 2019 | Categories: